Navigation

Home       About       Parties       Contact          
Showing posts with label Party DIY. Show all posts

Ice Cream Party

Friday, July 25, 2014

Ice cream party

And finally, the big reveal! You saw the cake and the balloons, now here are the pictures of the small ice cream party we had at home to celebrate the end of the school year.  

ice cream party stand

Naturally we had to have an ice cream stand.  This is a cardboard market stand that we bought at IKEA a while ago.  We covered up the red and green stripes that are on the bottom and the top of the stand with paper and added some cut out ice cream cones to decorate our stand. My younger daughter loved this and enjoyed giving out the ice cream from her "store".

ice cream van street stall

This ice cream van is available in our real store and it is so cute! I used it along with some baking/treat cups to hold the toppings and the ice cream cones.

ice cream toppings

ice cream toppings
yummy ice cream

And that's the end of our ice cream week.  Have a good weekend everyone!

DIY Ice Cream Balloons

Wednesday, July 23, 2014

DIY Ice Cream Balloons
As I said on Monday, it's ice cream week here on the blog. Here is a fun DIY that you can use to decorate for any themed party.

For our ice cream party, we decorated balloons with ice cream stickers to match the theme. I made these stickers by drawing the cones in Illustrator and then printing them on adhesive paper. Then I used my Silhouette to cut them out. I made a couple of them bigger and also used them to decorate our ice cream stand (more pictures of that on Friday!). 
DIY Ice Cream Balloons
I love how these turned out! You can do this for all of your themed parties. Find (or make) some stickers in your theme and simply stick them on plain balloons. It's fun for the kids to do too and they can feel like they helped to set up for the party. Plain balloons are still great, but decorated ones are so much more fun!

DIY Rainy Day Party Games

Wednesday, July 9, 2014

DIY Rainy Day Party Games

I was going to save this post for the fall when there are more rainy days, but here we are in July in Switzerland and it's cold and rainy! So I thought I would publish it now in case anybody is having a party soon and needs some ideas of what to do with the kids inside. For those of you in the warm sunshine (so jealous) you can pin this for later!

I've put together a few of my favorite games that we've played at family parties. You can quickly put these together using items that you probably already have around the house.  They are "minute-to-win-it" games that are fun for kids and adults alike.  Each person only has one minute to complete the challenge, so it ensures that no one gets bored watching the others play!

PS: Please excuse the picture quality. They were taken at last year's New Years Eve party at night!

Game #1 - Make it stick

Items needed:
  • Peanut butter
  • Slice of bread
  • Ping pong balls (as many as you can find)
  • Plate (optional)

peanut butter and ping pong ball game

The object of the game is to throw a ping pong ball and make it stick to the bread. To set it up, spread peanut butter on a piece of bread and put it on a paper plate.  It doesn't have to be on a plate, but it makes for easier clean up afterward.  Place the plate on one edge of a table. Have the player stand on the opposite edge to begin playing. Have one player at a time throw ping pong balls at the piece of bread. Each time a ball sticks to the bread, the player gets a point. Only one ball should be thrown at a time but they can throw as many balls as time allows (within a minute). The player that gets the most balls to stick to the bread wins. Tip: Have a rag close by to clean the ping pong palls…it will get messy.

Game #2 - Stack it up

Item needed: 
  • Plastic or paper cups (as many as possible, but I recommend at least 25)


This is a fun game you can play alone or in teams. Everyone gets the same amount of cups. The team that is able to stack their cups the highest (and have it stay up until it is measured) in one minute wins. When we played this game, the kids wanted to play it over and over. They tried many different ways of stacking to see how they could make the highest stack. Of course, the parents wanted in too! Definitely lots of fun. If you only have one set of cups, have the players take turns. It's best to use a lot of cups so that you can get it really high. Tip: A good way to see who has the highest stack is to having a measuring tape handy.

Game #3 - Drop, Sink, Clink

Items needed:
  • Some coins
  • 2 - 3 Vases
  • 2 - 3 Shot glasses (or small bowls)

This was super easy for the kids and most were able to get many coins in! Find a few vases and fill them about halfway with water. Drop in a shot glass until it is fully submerged. Add more water if needed. Give the kids some coins and have them try to drop them into the shot glasses. The smaller the opening of the shot glass, the harder it will be to get the coin in. The one who gets the most coins in the shot glasses within a minute wins. Tip: I recommend placing the vases on the floor and not on the table as a longer drop for the coins is more challenging.

Game #4 - Sock Grab

Items needed:
  • Socks (as many as you can find).  If you're like me, you have a whole drawer full of socks that are missing their pair…these are the perfect socks to use.

I don't have a picture for this one, but it's very easy to set up. Place a pile of socks in the middle of the room. The object of the game is to see who can put the most socks on one foot.  The game ends after one minute or when there are no more socks to put on, whichever comes first. Tip: Try to provide socks in different sizes…we laughed every time someone tried to put a baby sock over an adult sock.

You can have a winner for each game or, if you play the games at different times throughout the party, you can keep score for each child and the one who has the most points at the end wins a prize. Either way, I'm sure they will have a blast playing these games! 

The ideas from most of these games came from Pinterest and Google searches. You can even find some videos of these types of games on YouTube. Enjoy!

Party Hat Ice Cream Topper

Monday, June 9, 2014

Party Hat Ice Cream Topper | Paper & Party Love

It's getting hot outside and that usually means that we'll be having lots of ice cream.  Instead of having your ice cream plain, why not make a party out of it? Top your scoops off with these fun party hats made out of ice cream cones, sprinkles and gumballs! 

DIY Party Hat Ice Cream Topper | Paper & Party Love


Ingredients needed:
Ice cream cones
Sprinkles
Chocolate
Mini gumballs

Instructions:

1. Cut off the tops of your cones to create mini cones.  Then cut off the pointy end of the cone to make it flat so that the gumball can sit on top of it.

2. Pour your sprinkles into a bowl.

3. Melt the chocolate either in the microwave or using a double boiler. I used white chocolate in the picture above, but you can use whatever chocolate you prefer. Once it is melted, scoop it into a small bowl.

3.  Take one of the cones and dip the wider end first in the chocolate and then into your bowl of sprinkles.

4. Dip the other side of the cone into the chocolate and then into the sprinkles.  Place your gumball on top and you are finished!

5.Scoop your ice cream into a cup or a cone. Top with your party hats and enjoy!


Party hat ice cream topper on a cone | Paper & Party Love

Party hat ice cream topper by Paper & Party Love

These are so much fun for an ice cream party, on top of cupcakes for a circus-themed party, or just for a special treat with ice cream at home.

Margarita Drink Stirrers

Wednesday, April 30, 2014

Margarita Drink Stirrers | Paper & Party Love

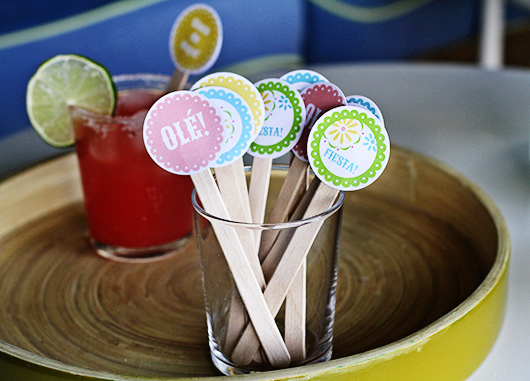
It seems to be margarita week on the blog! On Monday I shared my favorite margarita cupcake recipe and on Friday, I will share the recipe for these yummy-looking margaritas. Today I'm sharing these margarita drink stirrers I made.

Margarita Drink Stirrers | Paper & Party Love

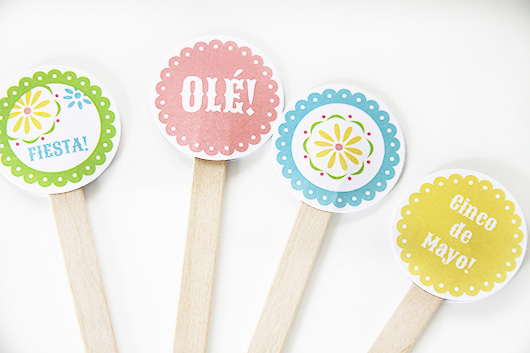
Last year, we had a Cinco de Mayo party and I made a Fiesta printable party collection.  These drink stirrers match that collection and you can download the circles to make them here today for free!  

Free Printable Margarita Drink Stirrer Circles | Paper & Party Love

They are simple to make.  You only need some glue, the printable file, and any kind of stirring stick such as a popsicle stick, lollipop stick or a skewer.  Once you print out the file, cut out the circles.  I used a 1.5 inch circle punch to make perfect circles.  I then placed glue on the back of one circle, placed the stick on it, and then glued another circle to the back to finish it off.

They are great for any upcoming Cinco de Mayo parties.  Why not make some for yours?


Chocolate Bunny Cupcake Toppers

Friday, April 11, 2014

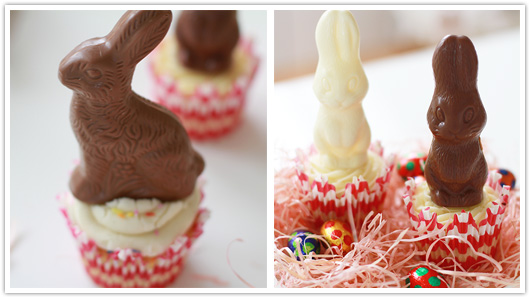
Chocolate Bunny Cupcake Topper | Paper & Party Love

Here's an easy way to make an Easter dessert with cupcakes. Simply place a chocolate bunny on top of your cupcakes and you have an easy Easter treat that looks great.  Make a few of them and group them together to use as a table centerpiece!

Party DIY::Valentines Candy Pouches Part 2

Wednesday, January 30, 2013

heart shaped candy pouch

On Monday, I wrote about Valentine's candy pouches and today, I was inspired to make more candy pouches, but this time, it's a heart-shaped pouch.  This one is even easier to make than Monday's cone-shaped pouch so I thought I would share it with you.  

To make this one, I simply cut out two hearts from scrapbook paper and used double-stick tape to put them together.  I left the top of the heart open and filled it with candy.  Then I used double-stick tape again to seal the top part closed.  I punched a hole and used it to attach the twine and printable tag (which you can download for free here).  And that's it! 

You can use any shape to make these pouches.  An egg-shaped one would be great for Easter or a square-shaped one would be great for a birthday party. Decorate them with ribbon or our printable tags to make them extra special!  

Party DIY::Valentine's Candy Pouches

Monday, January 28, 2013

diy valentines candy pouch
Hello everybody! I know it's been a while since I last posted, but I've been working on some new things and hope to be able to share them with you soon.  In the meantime, I've put together a little tutorial that is just in time for Valentine's day or your next party.  These favor pouches are really easy to make and take only a few minutes. They would be great for the kids to give to give to their friends and they can even help you make them.  Here we go!
These are the supplies that I used:

scrapbook paper (I cut mine to 15 cm x 15 cm)
glue lines (regular glue, double sided tape, or staples should also work. You can even sew these closed!)
hole puncher
twine
printable tag (you can download them for free below)
Optional: decorative edge scissors

Turn your piece of scrapbook paper over and add your glue about 2 cm in from one of the edges. It's hard to see the glue, so hopefully the arrow helps ;-).

Then, turn your piece of paper over and place a line of glue perpendicular to the glue line you added in the previous step.

Next, roll up your piece of paper and seal it by using the glue line you just added.

Then, press the side closed which has the glue that you added in step 1. 

Cut the edge using decorative edge scissors if you have them.

Add your candy to the pouch.

Press the open side closed in the opposite direction that you sealed the other end so that it looks like the picture above. Punch two holes at the top.

Thread the twine through the holes, add the printable tag, cut the edge with your decorative scissors and you are done!

See, it was easy peasy!  These would also be great for a wedding favor or at a kids party.  You could, depending on what size you make them, fill them with little toys or stickers.

Enjoy making them and giving them to your friends for Valentine's Day!

To get the free printable tags, please click this link

free valentines day printables

Please note that you will have to download the file to your computer from Google Drive to print it correctly. You can do that by clicking the download option under the file menu in Google Drive.  The document will download to the download folder on your computer and you will need Adobe Reader to view it.

Party DIY :: Cupcake Stands

Monday, November 19, 2012

Even though I have many cupcake and cake stands, sometimes none of the ones that I have fit with the table that I am decorating.  So, I've found that making my own cupcake or cake stands helps to solve the problem.  They are really easy to make and don't cost a fortune either. You'll find many tutorials out there already, but here's what I do:
First, I gather my supplies. For this, you will need a glue gun, a candle holder, and a plate.
Once the glue gun is ready, place some glue around the top rim of the candle holder as shown above.  Then, before the hot glue gets cold, center the plate on top of the candlestick.

 And that's it! Please note that this is not a permanent solution. The glue will eventually wear off the plate.  The good news about that is that you can reuse your plates and candle holders to make more stands!

You can use this method to make many different kinds of stands.  You can make multi-tiered stands, or use bowls instead of plates and use them to display chocolate or candy. You can also spray paint the candle holders to match your plate for a more seamless look. There are so many possibilities. Have fun!

Party DIY :: Rainbow Cake

Friday, April 20, 2012

Rainbow themed parties seem to be all the rage at the moment.  I love how colorful and bright they are. It would be perfect for a spring party. My favorite part has got to be the rainbow cakes that go with them. On the outside it looks like a normal white cake, but the inside is bursting with color.

It turns out it's not really that difficult to make. Cleanup is a bit more than usual since you will need six different bowls of cake batter, but putting it together is simple. You just need your favorite sponge cake recipe, food coloring, and frosting and you are ready to start!  My friend Sharon made one for us to try out. We had a lovely afternoon having tea and eating cake. It turned out great and so yummy! I even had it for breakfast this morning :-). Keep reading for the recipe and instructions.

You can use whatever sponge cake recipe you like or even a box mix.  Here is the recipe that Sharon used:

Ingredients:


8 eggs
8 ounces of self-raising flour
8 ounces of sugar
8 ounces of butter
Food coloring

For the frosting:

2 packages (500 g each) of powdered sugar
2 packages (400 g each) of cream cheese
125 g of butter

Preparation Instructions:

1. Preheat your oven to 170 degrees celsius on the fan setting.

2. In a large bowl, cream the butter and sugar together.

3. Beat in one egg and one teaspoon of flour. Mix well. Repeat until all of the eggs are mixed and you have used eight teaspoons of flour.

4. Mix in the remaining flour.  If the mixture is too thick, add milk one teaspoon at a time until you reach the desired consistency.

5. Separate the batter evenly into six bowls.

6. Add in the food coloring to each of the bowls to create your desired color.
7. Once you are satisfied with the colors, add the batter to a greased pan.  Cut a piece of baking paper the same size as your baking tin and place it on top of the uncooked mixture.  This helps to prevent the cake from forming a crust, which helps when you have a layered cake such as this.

8. Bake in the preheated oven on the fan setting for approximately 12 minutes or until the cake is cooked through.

9. Allow the cake to cool for five minutes before removing the baking paper. Remove the cake from the tin and let it cool completely.
10. While the cake is cooling, you can begin the preparation of the frosting.  Mix together the powdered sugar, butter and the cream cheese until it is the desired consistency.  If you feel that the mix is too dry, you can add a teaspoon or two of milk.


Cake assembly:
1. Place one layer of your cooled cake on a cake stand or plate.

2. Frost the top of the layer. You do not need to frost the sides of the cake yet.

3. Place another layer of cake on top of your frosted layer.

4. Frost the top of the layer.

5. Repeat steps 3-4 until all of the layers are stacked and frosted.

6. At this point, you can crumb coat the cake if desired.

7. Frost the sides and the top of the cake.

8. Enjoy your cake!


Party DIY :: Cardboard Handbags

Monday, March 26, 2012

Photo from Ikatbag.com

I love these cardboard handbags.  They would be great as party favor bags, as a craft activity at a party, or just for playtime at home.  Lorraine, of the blog Ikat Bag, made these for her daughter's Tea Party birthday.  She made the basic form and had the kids decorate the bags and make the beaded handles.  What a great idea and the kids looked like they had so much fun making them. Click here for the full post.  And while you're there, take a look at the rest of the web site.  There are so many great ideas for things to make.
Related Posts Plugin for WordPress, Blogger...