Navigation

Home       About       Parties       Contact          
Showing posts with label free printables. Show all posts

Valentine's Day Cupcakes for Two

Friday, January 30, 2015

Valentines Day Cupcakes for Two

Are you ready for Valentine's Day? How about celebrating it by making cupcakes just for two? 

I found a recipe that lets you make cupcakes using only one bowl, doesn't need a mixer, and makes just enough for two delicious cupcakes. I used baking cups and didn't even have to drag out the baking tin. Easy-peasy and feels special since there are only two.

You can find the recipe on How Sweet Eats.  I doubled the recipe to make one for everyone in my family :-)

Valentines Day Cupcakes for Two (or four)

To help you celebrate Valentine's day, I am sharing the printable cupcake toppers that you see in the pictures (for free!). You can download them here.  Enjoy!

Mother's Day Gift Tags - Free Printable!

Wednesday, May 7, 2014

Mother's Day Printable Gift Tag | Paper & Party Love

This year is going by so quickly and Mother's Day is this Sunday already! For those of you that need a last-minute gift tag, I created this free printable for you to download

Mother's Day Gift Tag - Free Printable


I wish all of you moms out there a great Mother's Day!

Margarita Drink Stirrers

Wednesday, April 30, 2014

Margarita Drink Stirrers | Paper & Party Love

It seems to be margarita week on the blog! On Monday I shared my favorite margarita cupcake recipe and on Friday, I will share the recipe for these yummy-looking margaritas. Today I'm sharing these margarita drink stirrers I made.

Margarita Drink Stirrers | Paper & Party Love

Last year, we had a Cinco de Mayo party and I made a Fiesta printable party collection.  These drink stirrers match that collection and you can download the circles to make them here today for free!  

Free Printable Margarita Drink Stirrer Circles | Paper & Party Love

They are simple to make.  You only need some glue, the printable file, and any kind of stirring stick such as a popsicle stick, lollipop stick or a skewer.  Once you print out the file, cut out the circles.  I used a 1.5 inch circle punch to make perfect circles.  I then placed glue on the back of one circle, placed the stick on it, and then glued another circle to the back to finish it off.

They are great for any upcoming Cinco de Mayo parties.  Why not make some for yours?


5 Simple Easter Table Decorating Ideas (and a Free Printable Banner!)

Wednesday, April 16, 2014

5 Simple Easter Table Decorating Ideas | Paper & Party Love

Easter is almost here and as most of us are busy, you might not have had time yet to think about decorating for Easter brunch or dinner.  I am all about keeping it simple and easy, especially around the holidays. There is enough to do with cooking and getting everything ready. But if you have friends and family coming over for dinner, I am sure you would like to decorate a little to commemorate the holiday. I wanted to share some decorating ideas with you that you can do with items you can easily get at the grocery store or probably already have around your house during this time of year.

1. Use a dyed egg as a place card. I wrote a name with a gold pen on an egg and placed it in a shot glass to hold it up. You can also just place it on top of a plate to keep it simple. 

2. Decorate with flowers.  I bought some tulips at the grocery store and placed them in a large vase and put them in the center of the table. It makes a big impact and is very simple to do. You can also place two or three flowers in small vases and place them around the table or at each place setting.

3. Download a printable Easter banner and use it to decorate a side table where you can place your drinks or desserts. I made the one you see above and you can download it for free here!

4.  Use dyed eggs (either from the grocery store or ones that you decorated) and fill a vase with them to bring color to your table. I love all of these bright colors!

5. Make an easy table centerpiece/dessert using cupcakes, eggs, and chocolate bunnies. Use the chocolate bunnies as cupcake toppers and decorate around them with eggs and Easter grass.

I hope that helps and that you can find simple ways to make your Easter table a little less ordinary with these simple decorations!

Bunny Tails & Bunny Poop - Free Printables!

Wednesday, April 9, 2014

Bunny Tails Printable Bag Toppers | Paper & Party Love

Easter is almost here and my friend Sharon, who blogs over on TheVazFamily, needed some printables for bunny tails and bunny poop bags she was making for an Easter party.  I made some for her and they turned out really cute!  I am sharing them here as a free download in case you would also like to use them for your Easter parties.

We used the bunny tails printables in two ways. One was as a bag topper like you see above, and the other was as a tag like below.  To make them into a tag, simply cut them in half and punch a hole to tie them around your package with a ribbon.  Sharon used tulle, clear plastic wrap, and raffia ribbon to wrap the marshmallows into a pretty little bundle.  She topped it off with our printable tag.  They look great, don't you think?

Bunny Tails Printable Tag | Paper & Party Love

For Christmas, we made reindeer poop bag toppers and the kids loved them. So, we made bunny poop bag toppers just for them.  This time though, instead of filling them with Maltesers, we filled up the bags with jellybeans.  I'm sure the kids will enjoy this one as well.  Anything with candy makes them happy!

Bunny Poop Printable Bag Toppers | Paper & Party Love

Click on the links below to download the printable files to make these at home.

Bunny Tails Printable Bag Toppers | Paper & Party Love
Bunny Poop Printable Bag Toppers | Paper & Party Love

Download the Bunny Poop Printable PDF File

Enjoy!

Party DIY::Valentines Candy Pouches Part 2

Wednesday, January 30, 2013

heart shaped candy pouch

On Monday, I wrote about Valentine's candy pouches and today, I was inspired to make more candy pouches, but this time, it's a heart-shaped pouch.  This one is even easier to make than Monday's cone-shaped pouch so I thought I would share it with you.  

To make this one, I simply cut out two hearts from scrapbook paper and used double-stick tape to put them together.  I left the top of the heart open and filled it with candy.  Then I used double-stick tape again to seal the top part closed.  I punched a hole and used it to attach the twine and printable tag (which you can download for free here).  And that's it! 

You can use any shape to make these pouches.  An egg-shaped one would be great for Easter or a square-shaped one would be great for a birthday party. Decorate them with ribbon or our printable tags to make them extra special!  

Party DIY::Valentine's Candy Pouches

Monday, January 28, 2013

diy valentines candy pouch
Hello everybody! I know it's been a while since I last posted, but I've been working on some new things and hope to be able to share them with you soon.  In the meantime, I've put together a little tutorial that is just in time for Valentine's day or your next party.  These favor pouches are really easy to make and take only a few minutes. They would be great for the kids to give to give to their friends and they can even help you make them.  Here we go!
These are the supplies that I used:

scrapbook paper (I cut mine to 15 cm x 15 cm)
glue lines (regular glue, double sided tape, or staples should also work. You can even sew these closed!)
hole puncher
twine
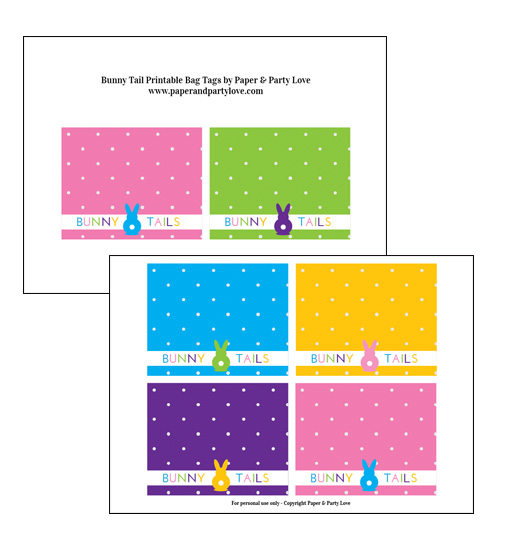
printable tag (you can download them for free below)
Optional: decorative edge scissors

Turn your piece of scrapbook paper over and add your glue about 2 cm in from one of the edges. It's hard to see the glue, so hopefully the arrow helps ;-).

Then, turn your piece of paper over and place a line of glue perpendicular to the glue line you added in the previous step.

Next, roll up your piece of paper and seal it by using the glue line you just added.

Then, press the side closed which has the glue that you added in step 1. 

Cut the edge using decorative edge scissors if you have them.

Add your candy to the pouch.

Press the open side closed in the opposite direction that you sealed the other end so that it looks like the picture above. Punch two holes at the top.

Thread the twine through the holes, add the printable tag, cut the edge with your decorative scissors and you are done!

See, it was easy peasy!  These would also be great for a wedding favor or at a kids party.  You could, depending on what size you make them, fill them with little toys or stickers.

Enjoy making them and giving them to your friends for Valentine's Day!

To get the free printable tags, please click this link

free valentines day printables

Please note that you will have to download the file to your computer from Google Drive to print it correctly. You can do that by clicking the download option under the file menu in Google Drive.  The document will download to the download folder on your computer and you will need Adobe Reader to view it.

Related Posts Plugin for WordPress, Blogger...